Showing posts with label holidays. Show all posts

Sunday, December 11, 2011

Ruffle Skirt Tutorial

I looked all around town for a plain-colored skirt (either red, white, black, or denim) that would work with these striped Christmas tights I bought for Chloe. (I also bought her a pair of red striped tights). I couldn't find what I was looking for (at least not at a price I was willing to pay)--seriously, $30.00 for a clothing item my baby will fit for approximately a month?
No thank you.
So the alternative was to make her a skirt. I looked at the fabric remnants at Hobby Lobby and found this great piece of red fabric for $2.00. I was trying to decide if I should just do a traditional skirt with a hem and some elastic at the top, or if I wanted to attempt the ruffles I'd been picturing in my head. I decided to go for the ruffles, and I'm so glad I did. From start to finish this skirt took me about 4 hours. Not too bad.

Wanna make one for the cute little girl in your life (or for you?) Read on, my friend.

1. Iron your fabric. I only needed 3/4 yard for this project, but Chloe is only 2 months old, so she's still pretty little. If you are making this for an adult or for an older child you will need to adjust the fabric accordingly.

2. Cut five strips of fabric. 40 inches long, 3 inches wide.

Now watch this video so the rest of the instructions will make more sense:


3. Hem the fabric strip on one end. (As shown in the tutorial video.)

4. Create the ruffle edge on each strip of fabric. (As shown in the tutorial video.)

5. Pin each strip onto a flat piece of fabric.
6. Sew each strip on, doing your best to keep them evenly spaced (you can measure if it makes you feel better, but once again, I sort of just eyeballed.) I did a straight stitch and then a zig-zag. It should look something like this when they are all sewed on:
7. Fold over an edge of the fabric so it covers the raw edge of the top ruffle. (As shown in the tutorial video.)

8. Create a casing for the elastic waistband and thread the elastic through (we used a wire hanger--thanks husband, for the idea). I didn't video this part or take photos, so if you don't know how to create a little casing, you might have to google it. Sorry.
9. Turn your skirt inside-out, line up the ruffles, and one-by-one stitch them together. Do your best to line the ruffles up so that they look continuous. It should look something like this from the inside when you are done:
and like this on the outside.
Then put it on your cute little model:
Hope this makes sense. Email me with questions. :)

Friday, December 2, 2011

Infant Holiday Photography

I tried my hand at a few Christmas photos of my sweet new baby girl.

She's got quite the little personality. I think they turned out pretty cute. :)

Saturday, November 26, 2011

Reindeer Cookies and Ninjabread Men


I attempted the reindeer cookies I talked about in THIS post.

I didn't think about doing them until I was already home from the grocery store, so I used what I had on hand (meaning the pretzels aren't chocolate covered and the candies are a little different than the ones they use in the original recipe.) I think they still turned out pretty cute. I also used gingerbread dough instead of peanut butter like the original poster used.

This is the recipe I used:
  • 3 cups flour
  • 2 teaspoons ground Ginger
  • 1 teaspoon ground Cinnamon
  • 1 teaspoon baking soda
  • 1/4 teaspoon ground Nutmeg
  • 1/4 teaspoon salt
  • 3/4 cup butter, softened
  • 3/4 cup firmly packed brown sugar
  • 1/2 cup molasses
  • 1 egg
  • 1 teaspoon Pure Vanilla Extract

Directions

  1. Mix flour, ginger, cinnamon, baking soda, nutmeg and salt in large bowl. Beat butter and brown sugar in large bowl with electric mixer on medium speed until light and fluffy. Add molasses, egg and vanilla; beat well. Gradually beat in flour mixture on low speed until well mixed. Press dough into a thick flat disk. Wrap in plastic wrap. Refrigerate 4 hours or overnight.
  2. Preheat oven to 350 degrees F. Roll out dough to 1/4-inch thickness on lightly floured work surface. Cut into gingerbread men shapes with 5-inch cookie cutter. Place 1 inch apart on ungreased baking sheets.
  3. Bake 8 to 10 minutes or until edges of cookies are set and just begin to brown. Cool on baking sheets 1 to 2 minutes. Remove to wire racks; cool completely. Decorate cooled cookies as desired. Store cookies in airtight container up to 5 days.
I found the recipe HERE.
I also made "Ninjabread Men." My husband bought me cookie cutters for my birthday last month. They turned out pretty cool, right? :)

Wednesday, February 2, 2011

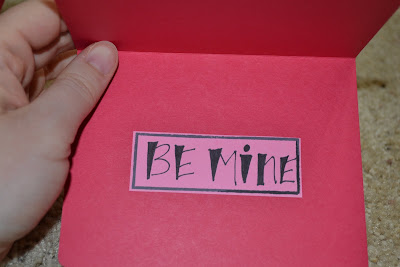
Be Mine, Valentine

I like making cards, and I rarely get an excuse to make them except for birthdays...so Valentines day seemed like the perfect excuse to make some home-made Valentines to send to my family back in Utah.
I tried to keep a theme of sorts going with the ruffle paper punch and the flowers. It's almost like a little handmade card "collection." :) I kept thinking, "They all have to be alike or people will feel bad that someone else's is cuter than theirs." Wait...they are all going to different houses.... Oh well. :) Still fun.

Monday, December 13, 2010

Christmas Cookies

Today I invited my friend Eliza over to help me make sugar cookies. My mom gave me these cute cutters for my birthday that you fill the little holes in the cutouts with crushed up Lifesavers. The end result is supposed to look like stained glass. I'm not sure that ours turned out quite like they were supposed to...but they weren't awful.

(Before they went in the oven)
When they came out:
After those cookies were done, we moved onto traditional sugar cookies. My mom warned me I should probably not double the batch...but I did. :-/ Hours and hours later, and 200 or so cookies later, I was done. I gave up frosting them after about 175, and threw the rest of the unfrosted ones in the garbage. I couldn't look at another cookie.Oh, I also had these cute sugar printed peel-off stickers that you can eat. They turned out really cute. :)Even though it took literally all day, it was all worth it because they turned out pretty cute.Then I put a variety of cookies into some cute Christmas tins, and took them around to my neighbors.What are you doing for your neighbor gifts this year?

For some more holiday inspiration, check out these other holiday posts on Craft Rookie:
"Can't Get Enough..."
"It's Beginning to Look A Lot Like..."