I hope everyone had an awesome Labor Day weekend! I know I did.
This is a project I've had in mind for a really long time, but just barely got around to doing it. It took a lot of thought, some improvising, and a couple of re-dos before I got it how I wanted it, but now here it is, with a tutorial. :)
 First of all, I got this idea from Ashley at Make It and Love It (it's where many of my craft ideas are born)....if you want to see her tutorial, you can click here.
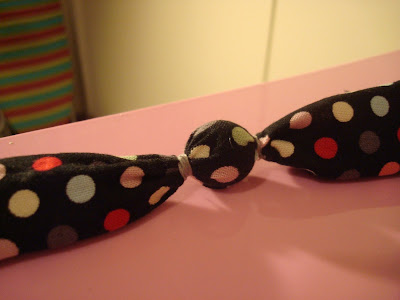
Here's my version:
First of all, I bought some elastic string meant for jewelry-making. I also bought some hooks for the ends of the bracelet, and some wooden beads to use as my base. Other than that, the only supplies you will need are scissors, thread, and a strip of fabric.


 Ashley at Make It and Love It made her bracelet a little differently, but I did what I felt was easiest for me. So you can either follow her tutorial or mine, depending on which seems easier for you.
The first thing I did was sew my fabric up the side and flip it inside-out (just like how I did my apron strings in my last tutorial.) I felt that the nice seam was easier to deal with than trying to keep the fabric tight around the bead like Ashley does.

 Next I tied a knot at the end of my stretchy string and put my first bead on.
 Then I stuck it down the tube, and starting the process of tying thread around the ends.

 Make sure to leave some extra fabric on the end, because you need to attach the smaller bead that anchors the hook at the end of the project. (It'll make sense in a minute.)
Now, continue tying the beads on...threading each one along the elastic string, then separating each one with coordinating thread. Make sure you are pulling it tight and pinching the ends really tightly so you can see the shape of your beads really well.


 Now comes the hardest part (for me, anyway.) Getting the hooks on tight was pretty frustrating for me, but maybe you'll be smarter than I was. I won't show you all my trial-and-error versions of getting my hooks on tight...I'll just show you the version that worked. :)
Take a bead--preferrably a little smaller than the ones in your bracelet...but they can be the same size if that's all you have (my bag came with all different sizes...).
Get a needle and thread and put it through the bead hole (you don't need a needle if the holes on your beads are wide enough, but mine weren't, so do what works for you.)
 Tie a knot around the bead, leaving a long tail (because you are going to keep weaving the thread through the bead.)
 Loop the thread around and around the bead till it looks something like this:
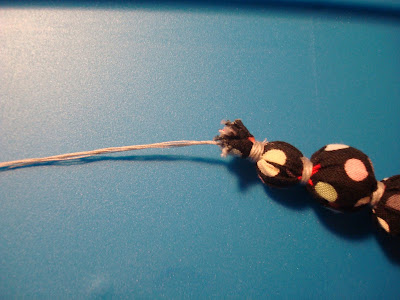
 The point of this is just to have a really good anchor to tie your hook and clasp on. You should still have a long tail coming out from your bead. (Preferably with multiple strings of thread to make it sturdier.)
Now stick the bead into your excess fabric and tie it off, making sure to keep the tail out so you can still tie your hook on tight.
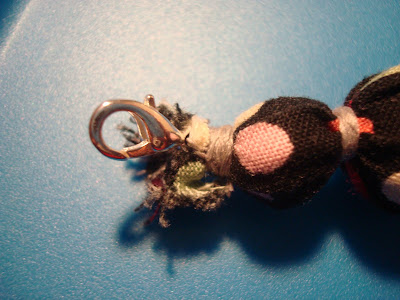
 Now tie your hook on, and wrap the excess tail of thread around the bead for extra security. :)
 Do the exact same thing to attach the hook on the other end:
 Don't worry that it looks a little messy by the hooks...no one will see that part too much once it's on your wrist. :) And besides, it's supposed to look a little shabby. :) Ashley at Make It and Love It adds some Fray Ease at the ends to keep it from unraveling...I didn't do that, but I might still. Who knows?
Now the only thing left to do is wear it. :)

This is a project I've had in mind for a really long time, but just barely got around to doing it. It took a lot of thought, some improvising, and a couple of re-dos before I got it how I wanted it, but now here it is, with a tutorial. :)
 First of all, I got this idea from Ashley at Make It and Love It (it's where many of my craft ideas are born)....if you want to see her tutorial, you can click here.
Here's my version:
First of all, I bought some elastic string meant for jewelry-making. I also bought some hooks for the ends of the bracelet, and some wooden beads to use as my base. Other than that, the only supplies you will need are scissors, thread, and a strip of fabric.


 Ashley at Make It and Love It made her bracelet a little differently, but I did what I felt was easiest for me. So you can either follow her tutorial or mine, depending on which seems easier for you.
The first thing I did was sew my fabric up the side and flip it inside-out (just like how I did my apron strings in my last tutorial.) I felt that the nice seam was easier to deal with than trying to keep the fabric tight around the bead like Ashley does.

 Next I tied a knot at the end of my stretchy string and put my first bead on.
 Then I stuck it down the tube, and starting the process of tying thread around the ends.
 Make sure to leave some extra fabric on the end, because you need to attach the smaller bead that anchors the hook at the end of the project. (It'll make sense in a minute.)
Now, continue tying the beads on...threading each one along the elastic string, then separating each one with coordinating thread. Make sure you are pulling it tight and pinching the ends really tightly so you can see the shape of your beads really well.


 Now comes the hardest part (for me, anyway.) Getting the hooks on tight was pretty frustrating for me, but maybe you'll be smarter than I was. I won't show you all my trial-and-error versions of getting my hooks on tight...I'll just show you the version that worked. :)
Take a bead--preferrably a little smaller than the ones in your bracelet...but they can be the same size if that's all you have (my bag came with all different sizes...).
Get a needle and thread and put it through the bead hole (you don't need a needle if the holes on your beads are wide enough, but mine weren't, so do what works for you.)
 Tie a knot around the bead, leaving a long tail (because you are going to keep weaving the thread through the bead.)
 Loop the thread around and around the bead till it looks something like this:
 The point of this is just to have a really good anchor to tie your hook and clasp on. You should still have a long tail coming out from your bead. (Preferably with multiple strings of thread to make it sturdier.)
Now stick the bead into your excess fabric and tie it off, making sure to keep the tail out so you can still tie your hook on tight.
 Now tie your hook on, and wrap the excess tail of thread around the bead for extra security. :)
 Do the exact same thing to attach the hook on the other end:
 Don't worry that it looks a little messy by the hooks...no one will see that part too much once it's on your wrist. :) And besides, it's supposed to look a little shabby. :) Ashley at Make It and Love It adds some Fray Ease at the ends to keep it from unraveling...I didn't do that, but I might still. Who knows?
Now the only thing left to do is wear it. :)


6 comments:
I just tried that too but with a necklace. I had a hard time with the closure so I just made ties on it. I also just knotted in between. I like the look yours produced though. I will have to try it!
Also...where did you get a hold of such a cute font?
This is so cute! I love the fabric you used.
This is so cute!!! I've got to make one of these bracelets for my teenage daughter. Your instructions are very easy to follow.
What a cute bracelet and a great tutorial! I think I'll try it out!
Darling!!!
Post a Comment