

 So here's what I did:
First you start by wrapping the ribbon you want to use around wooden dowels. (I found that silkier/thinner ribbon actually curled better than the thicker grosgrain ribbon.) I didn't have any dowels on hand, and I really didn't want to go to the craft store just for them, so I improvised and used the handles of my wooden spoons. I don't use wooden spoons in my every day life {ever} so I didn't feel bad donating them to the cause, but if you use your wooden spoons to cook with then you should probably not use them for this (because they will dry out and crack in the oven.)
So I wrapped the ribbon around the handle. If you wrap it really tightly at the top, you won't need to use anything to secure it at the top, but when you get to the bottom, use a straight pin to hold it tight on the bottom. (I've also seen people use clothespins or those {metal!} binder clips.)
Next you need to immerse it in water. Leave them in long enough for the wood to soak up some water, and obviously, enough time to get the ribbon soaked.
 Next lay them onto a baking sheet {covered with tinfoil} and stick them in the oven. The tutorial I originally read said to do it at 200 degrees fahrenheit, but I felt like that was taking forever, so I upped my temperature to 250 and it seemed to work better. You need to leave them in the oven until the ribbon is completely dry. For me, this took about 35-45 minutes. You can just keep checking and see if the ribbon seems dry or if it's still damp.
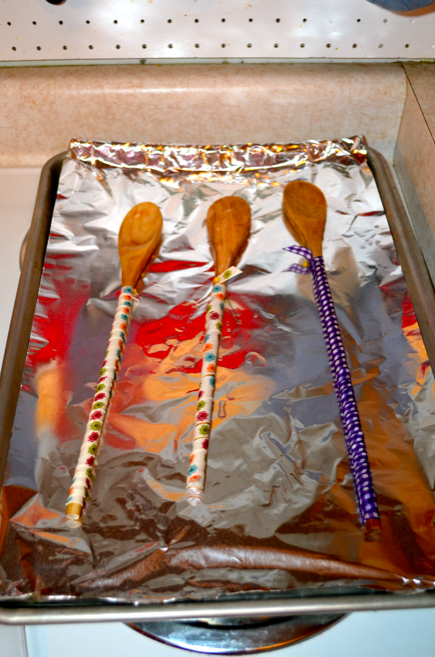 Once they are done, take them out and just let them cool off a bit (it doesn't take that long). Then carefully unroll them from the spoons. I'm not sure why, but I failed to take a picture of this step. Basically, you'll have big long curly ribbons. Then you just cut them to the length you'd like depending on how floofy or hangy you want them to be (technical craft words there, I know...). I cut mine into strips about 3 inches or so long. You can kind of eyeball them and get the hang of what you are looking for.
Next, take your strips of curled ribbon and layer them onto a straightpin (with a ball at the bottom so they don't come off the other end). You can kind of arrange them onto the pin as you go so that they sort of alternate and fan out. (In other words, you don't want to stack them all the same direction...vary the direction you place them on the pin.)


 Once they are on the pin, the tricky part begins. You have to sew it all together (the original tutorial I looked at says to use floral wire, but I wasn't sure that would secure them good enough, and I didn't want it to come unwrapped and poke my baby!). So anyway, I took the layered bow (floofed and shaped how I liked it) and stuck it onto my sewing machine so that the foot of my machine was sitting right on the center of all the ribbons (self explanatory, right?) and then I just stitched forward and back, forward and back, forward and back until I felt like it was nice and secure.
  The stitching can be kind of difficult because it's hard to get all the ribbons onto your sewing machine without them shifting from how you've arranged them on the pin. Just be patient and go slowly and it should work out fine! (It just dawned on me that you could also just hand-stitch them together with a needle and thread. This might be a less frustrating approach, though it might be kind of hard to push the needle through all the layers of ribbon.)
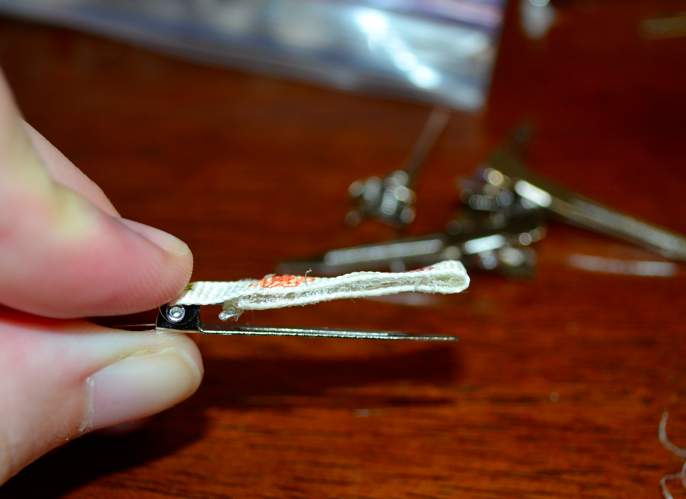
Once they are all sewn together, you need to make the clip to stick to the bottom of them. If you are making them for an older child that you plan to clip it right into their hair, you could get the hairbow kind that actually clip into hair. If you are making them for children with less hair and you plan to attach them to a headband, then I would recommend alligator clips.
Heat up your hot glue gun, cut a strip of coordinating ribbon, and glue it onto the clip like so:
 After it's dried, trim any excess ribbon that might be going over the head of the clip.
Next, decide which sides of your curly bow you want to be the top and bottom.
 I just kind of inspected mine and tried to put the prettiest side upward (the pic above is of the bottom of the bow where I decided to glue my clip on. If you look closely you can see the stitching from the sewing machine). Take the clip, and add hot glue to the top of the ribbon you just attached, then place the clip onto the curly bow and push down.
 Then just let it dry for a second, flip it over, floof it, and you have yourself a corkscrew bow to attach to headbands (or straight to hair.)


 Hope that makes sense! You can email me with questions, or go to that other tutorial I linked up at the beginning and see if they explained it better. (It's really not that complicated!)
Also, before I sign off, here's a sneak peek at what's been going on in the nursery:

9 comments:
Those are really cute Dani! Much more fun to make them yourself rather than buying them!
Way cute! I love them and need to make oh a million!! Thanks for the awesome tutorial!!
I havent tried it yet but i was thinking, if you use a sewing needle with a small eraser on one end it might be easier getting them off and keeping it how you want it. Just an idea. Thanks for the awesome tutorial though, im just getting into the diy scene!
I actually just tryed this myself but off of another blog. They turned out really cute!! I did NOT put them in any water though. I just baked them at 275 degrees for 25 minutes and they curled perfectly!!
I am really enjoying this site and all the crafts and ideas. Hope to read more articles and see some new pictures.
I just did these today...275 degrees for 15 min....so cool......love the site!
Thanks for sharing this. I am making these for my puppy's harness as she doesn't have quite enough hair yet. Also, the E6000 glue is really good instead of a hot glue gun.
ok, thank you for the information
How To Treat Split Ends
This is a really creative way to make hair bows.
Post a Comment