Showing posts with label fashion. Show all posts

Tuesday, February 28, 2012

Pillowcase Dress & Baby Headbands

My friend Eliza and I have been working on pillowcase dresses for our baby girls this past week. I finally finished mine tonight after buying the ribbon I needed for the straps. I think it turned out super cute! I also made this headband to match it. I made it a little big because it needs to fit her noggin at the same time as the dress--which I'm hoping will be this summer. I really liked how it turned out. I've discovered making baby clothes is a labor of love. I think I will continue to purchase 99% of her wardrobe instead of making stuff, but on occasion it can be a fun little challenge.

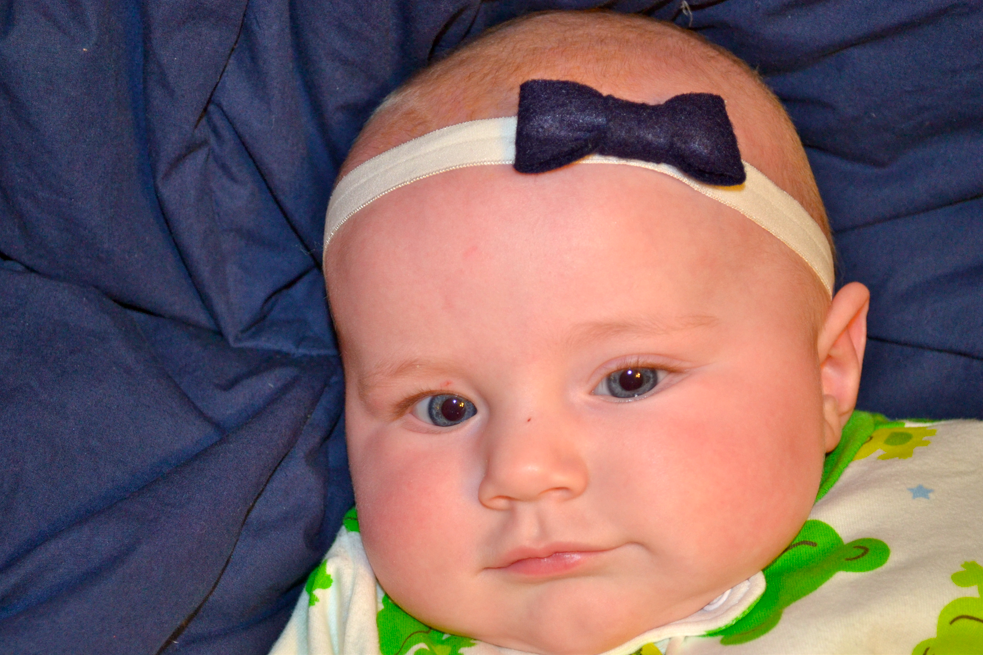
A much less time-consuming craft we've also been dabbling in lately is headbands (as previewed above).

I had planned before Chloe was born to put headbands on her a lot, but as it turns out, I usually only put them on long enough to take a few photos or for church because they tend to leave marks on her head that make me feel guilty. My new-found solution is to buy adult elastic headbands because then they sit on her head way looser and don't leave marks.

I've been dolling them up by glue-gunning flowers and bows onto them. I'm excited to have people (hopefully) stop mistaking my poor bald child for a boy (granted, this only happens when she's in her car seat and her bright girlie clothes are covered with her blanket...but it's still annoying.)(Purple bow and purple elastic from Hobby Lobby.)
Navy felt bow made by Eliza, white elastic headband from Hobby Lobby
(Black checkered bow from Hobby Lobby, Black elastic from Walgreens.)
(Hot pink flowers from Joann's, pink headband from Hobby Lobby)
(Red polka dot bow and black elastic headband from Hobby Lobby)

Wes calls this her "Nephite Headband." I think it just looks too far forward because it's wide and she has no hair in front. :)This last one is to match her Easter dress which is made out of this fabric:Cute, right?
(Gray flowers from Target, neon yellow elastic headband from Walgreens.)

Sunday, December 11, 2011

Ruffle Skirt Tutorial

I looked all around town for a plain-colored skirt (either red, white, black, or denim) that would work with these striped Christmas tights I bought for Chloe. (I also bought her a pair of red striped tights). I couldn't find what I was looking for (at least not at a price I was willing to pay)--seriously, $30.00 for a clothing item my baby will fit for approximately a month?
No thank you.
So the alternative was to make her a skirt. I looked at the fabric remnants at Hobby Lobby and found this great piece of red fabric for $2.00. I was trying to decide if I should just do a traditional skirt with a hem and some elastic at the top, or if I wanted to attempt the ruffles I'd been picturing in my head. I decided to go for the ruffles, and I'm so glad I did. From start to finish this skirt took me about 4 hours. Not too bad.

Wanna make one for the cute little girl in your life (or for you?) Read on, my friend.

1. Iron your fabric. I only needed 3/4 yard for this project, but Chloe is only 2 months old, so she's still pretty little. If you are making this for an adult or for an older child you will need to adjust the fabric accordingly.

2. Cut five strips of fabric. 40 inches long, 3 inches wide.

Now watch this video so the rest of the instructions will make more sense:


3. Hem the fabric strip on one end. (As shown in the tutorial video.)

4. Create the ruffle edge on each strip of fabric. (As shown in the tutorial video.)

5. Pin each strip onto a flat piece of fabric.
6. Sew each strip on, doing your best to keep them evenly spaced (you can measure if it makes you feel better, but once again, I sort of just eyeballed.) I did a straight stitch and then a zig-zag. It should look something like this when they are all sewed on:
7. Fold over an edge of the fabric so it covers the raw edge of the top ruffle. (As shown in the tutorial video.)

8. Create a casing for the elastic waistband and thread the elastic through (we used a wire hanger--thanks husband, for the idea). I didn't video this part or take photos, so if you don't know how to create a little casing, you might have to google it. Sorry.
9. Turn your skirt inside-out, line up the ruffles, and one-by-one stitch them together. Do your best to line the ruffles up so that they look continuous. It should look something like this from the inside when you are done:
and like this on the outside.
Then put it on your cute little model:
Hope this makes sense. Email me with questions. :)

Saturday, September 24, 2011

Baby Girl Tutu

I made this little red tutu to take some newborn pictures when the baby comes. If you want to see how I made it, you can refer to my tutorial HERE.
PS: We're officially down to 14 days to go! :) (At least theoretically.)

Wednesday, September 21, 2011

Corkscrew Hair Bows

My latest project (besides getting the baby's room ready!) has been making corkscrew hairbows to attach to headbands. I used THIS tutorial here to figure out how to get the ribbon to curl, then kind of did my own thing from there.
So here's what I did:

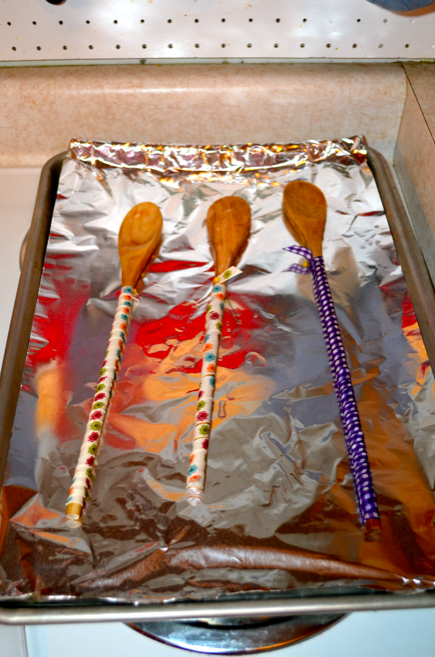
First you start by wrapping the ribbon you want to use around wooden dowels. (I found that silkier/thinner ribbon actually curled better than the thicker grosgrain ribbon.) I didn't have any dowels on hand, and I really didn't want to go to the craft store just for them, so I improvised and used the handles of my wooden spoons. I don't use wooden spoons in my every day life {ever} so I didn't feel bad donating them to the cause, but if you use your wooden spoons to cook with then you should probably not use them for this (because they will dry out and crack in the oven.)

So I wrapped the ribbon around the handle. If you wrap it really tightly at the top, you won't need to use anything to secure it at the top, but when you get to the bottom, use a straight pin to hold it tight on the bottom. (I've also seen people use clothespins or those {metal!} binder clips.)

Next you need to immerse it in water. Leave them in long enough for the wood to soak up some water, and obviously, enough time to get the ribbon soaked.
Next lay them onto a baking sheet {covered with tinfoil} and stick them in the oven. The tutorial I originally read said to do it at 200 degrees fahrenheit, but I felt like that was taking forever, so I upped my temperature to 250 and it seemed to work better. You need to leave them in the oven until the ribbon is completely dry. For me, this took about 35-45 minutes. You can just keep checking and see if the ribbon seems dry or if it's still damp.
Once they are done, take them out and just let them cool off a bit (it doesn't take that long). Then carefully unroll them from the spoons. I'm not sure why, but I failed to take a picture of this step. Basically, you'll have big long curly ribbons. Then you just cut them to the length you'd like depending on how floofy or hangy you want them to be (technical craft words there, I know...). I cut mine into strips about 3 inches or so long. You can kind of eyeball them and get the hang of what you are looking for.

Next, take your strips of curled ribbon and layer them onto a straightpin (with a ball at the bottom so they don't come off the other end). You can kind of arrange them onto the pin as you go so that they sort of alternate and fan out. (In other words, you don't want to stack them all the same direction...vary the direction you place them on the pin.) Once they are on the pin, the tricky part begins. You have to sew it all together (the original tutorial I looked at says to use floral wire, but I wasn't sure that would secure them good enough, and I didn't want it to come unwrapped and poke my baby!). So anyway, I took the layered bow (floofed and shaped how I liked it) and stuck it onto my sewing machine so that the foot of my machine was sitting right on the center of all the ribbons (self explanatory, right?) and then I just stitched forward and back, forward and back, forward and back until I felt like it was nice and secure. The stitching can be kind of difficult because it's hard to get all the ribbons onto your sewing machine without them shifting from how you've arranged them on the pin. Just be patient and go slowly and it should work out fine! (It just dawned on me that you could also just hand-stitch them together with a needle and thread. This might be a less frustrating approach, though it might be kind of hard to push the needle through all the layers of ribbon.)

Once they are all sewn together, you need to make the clip to stick to the bottom of them. If you are making them for an older child that you plan to clip it right into their hair, you could get the hairbow kind that actually clip into hair. If you are making them for children with less hair and you plan to attach them to a headband, then I would recommend alligator clips.

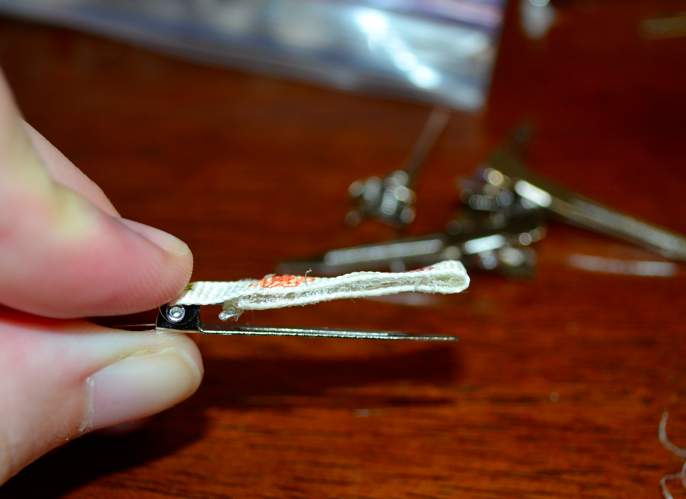
Heat up your hot glue gun, cut a strip of coordinating ribbon, and glue it onto the clip like so: After it's dried, trim any excess ribbon that might be going over the head of the clip.

Next, decide which sides of your curly bow you want to be the top and bottom. I just kind of inspected mine and tried to put the prettiest side upward (the pic above is of the bottom of the bow where I decided to glue my clip on. If you look closely you can see the stitching from the sewing machine). Take the clip, and add hot glue to the top of the ribbon you just attached, then place the clip onto the curly bow and push down.Then just let it dry for a second, flip it over, floof it, and you have yourself a corkscrew bow to attach to headbands (or straight to hair.)Hope that makes sense! You can email me with questions, or go to that other tutorial I linked up at the beginning and see if they explained it better. (It's really not that complicated!)

Also, before I sign off, here's a sneak peek at what's been going on in the nursery: