

I got this yellow heart-shaped holder for my 5th birthday. Seriously. I still remember getting it. My cousin Amy gave it to me and I loved it. Back then it held a lot of fake pearls and plastic jewelry....since then it followed me as I moved away from home, went to college, and even during our first year of marriage. Let's face it, once you have a holder like this to keep all of your necklaces from getting tangled, you will ALWAYS need a necklace holder. I can't imagine being without one. So since this one is getting a little....childish...for me, I decided to make a new one!
Exhibit A:
 Oh look it still has plastic jewelry on it....well, I said I grew up, I didn't say I got rich, did I?
So here's what you need for this creation:
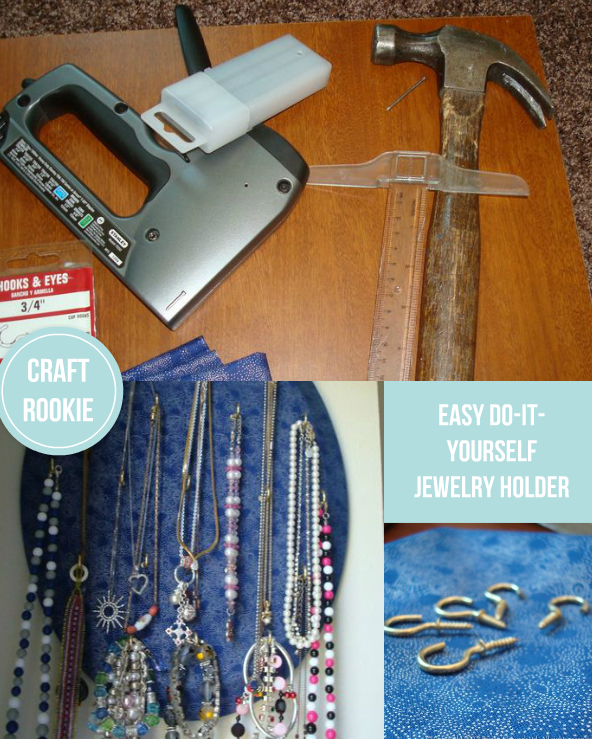
**A hammer
**A skinny nail of some sort
**A staple gun and staples for the gun
**Some cute fabric (you could also use pattern paper and Mod Podge but the fabric really worked well for me in this case....and I didn't even have to mod podge. :))
**A T-Square, ruler, or straight-line guide of some sort to line up your hooks.
**Hooks
**A piece of wood you want to use for your necklace board
**Some sort of picture hook to put on the back to hang it to the wall with.
 I got these hooks at Home Depot. You get 100 for about $4.00, so I can live with that. :) You wouldn't have to buy hooks...you could use old furniture knobs, nails (although that wouldn't look super-cute) or whatever else you want. Be creative. :) I chose these hooks because they were small (so I could put a lot on one board), because they were inexpensive (furniture knobs cost about $3.00 or so each to buy new), and because they looked easy to attach....and they were.
 Here's what they look like individually.
 I have to apologize here for my lack of pictures. I was in a hurry when I made this and sort of forgot to do photos as I went. So I hope I can explain how I did things. Don't worry...it's super-easy (I did it. :))
Take the piece of wood you want to use (I got mine in the unfinished wood section at Hobby Lobby. It was on half-price this week so I got it for $6.00). Cover it with the fabric, flip it over, and staple gun it like crazy. The trick is to just keep it pulled tight. I did a staple on all four sides first to keep it held tight (like one staple at the top, one on each side, and one at the bottom) and then worried about getting it tight everywhere else.
It really helps as you are stapling on the fabric to have two people. My husband stapled while I held the fabric tight, and I think it really made it easier than if I were to try to hold it tight and staple all at once (although it wouldn't be impossible to do that....just harder and slower.)
So after you have the fabric on all snug, the next step is to create some holes for your screws. Take a ruler and make a straight line on your board (I just eyeballed, but if you want perfection you could measure it out all straight and equal). Just hold the ruler straight, and have your craft buddy take the nail and hammer and hammer little holes in the places you want the hooks along the line.
Then take your little hooks, and screw them into the holes. It works like a charm. :) Keep repeating this for however many rows you want. We staggered the hooks every other line so the necklaces could hang down in between them a little bit.
The result of your crafty efforts (by the way, the angle of this picture makes my hooks look more out-of-line than they actually are:)

Simple and cute!
This project (with my husband's help) took about 15-20 minutes from start to finish. It's super-easy and now it matches my room and I can get rid of the frilly five-year-old heart shaped one without losing functionality of nicely organized jewelry. Seriously, if you have a lot of necklaces or bracelets, it helps out so much. :)If you make this project, comment on this blog with the link to a picture so I can see how your version turns out.
Happy Crafting!
2 comments:
That's very cute, and a great idea. I just have one of those Scotch brand hooks with those removable tab things on my wall right now, very unpretty. I think I now have another project I need to make :)
great idea- I posted my take on it at my blog-
www.thechroniclesofcolette.blogspot.com. Thanks for the creative juice!
Colette
Post a Comment