 Into that?
You can do it! Here's what you need:
Some cute material
An old chair you want to re-cover
A staple-gun
A hammer
An iron/ironing board (if your material is wrinkly)
Here we go....brace yourself for a quick, fun, and easy project!
 First, iron your material.
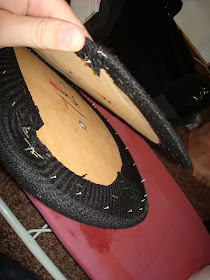
 Next, remove the back of the chair, and the seat of the chair.
 If your chair is like mine, you need to remove the front part of the backrest, from the back part. {Excuse the icky ironing board...we (the ironing board and I) had a little applique mishap a couple days ago....}
 Then lay all your pieces on your material to make sure you have enough.
 Fold the material over the edges of the seat, etc to make sure you have enough to pull over and staple.
 Do that on all four sides.
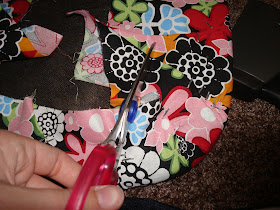
 Cut off your excess material.
 Staple away! I think it's easiest if you do one staple on each of the four sides (pulling it tight as you do each side). This keeps it from shifting as you staple the rest of the material to the chair. *The KEY is to KEEP PULLING TIGHT. Pull tight before each staple.*
 On the corners, just try to pull as tight as you can and make the edge look as smooth as you can. Doing a nice "hospital corner" or "military corner" or whatever you want to call it, will help with this.
 You'll notice after it's all stapled that you've got a lot of excess material hanging down.
 Trim the material as close to the staples as you can (because you don't want it hanging down under the chair or it will look sloppy.)
 Once it's all trimmed, it should look like this underneath!
 Do this same process to all of your pieces: Seat cushion, backrest, and back of the backrest.
 Now re-attach the two halves of the backrest. I used staple-gun nails They were so small you could barely tell they were there.
 Now re-attach all the screws, etc and get your seat put on.
 Voila! The seat part is done!
Yay! The backrest is on, and lookin' sharp. See, you can't even tell where I put the nails, can you? (Okay, if you click on the picture and enlarge it you can, but STILL!)
 Your chair is now complete, and doesn't it look pretty?
 Now my chair and craft desk are matchy-matchy.
Any questions? Feel free to ask.
Happy Crafting!


Wow! I love it! I want to do it. Maybe I could find a chair like that at savers or someplace cux I don't have one on hand. I'll check back for more updates.
ReplyDeleteLove this idea so much I had to feature it today! Thanks for sharing your creativity!
ReplyDeleteI just found your blog from another craft blog site (these craft blogs abound!! And I love it!). Anyway - chairs like this are on sale this coming week at Staples for $9.99 (regular $39.99 minus $20 instant savings minus $10 easy rebate).
ReplyDeleteThis could be dangerous, me combining the deal blogs & craft blogs!
That is SO SO CUTE~Great tutorial!
ReplyDeleteI absolutely LOVE that! I think even I could so it, especially with your great tutorial.
ReplyDeleteThanks craft rookie! I got to this from Kari's U Create blog. I will be trying this on my maroon hand-me-down craft chair. It was ok in our apartment, but now I have a new home (and a fun new craft room) so it really needs a makeover! Thanks again. I'll be coming back!
ReplyDeleteLove this!! I re-covered my hideous office chair but didn't do it this way... WISH I HAD!! Now I am going to re-cover it again! Thanks for the great tutorial! Take care!
ReplyDeleteI am so doing this to my ugly blue office chair!!! Thanks for sharing!
ReplyDeleteThat is too cute!!
ReplyDeleteAwesome re-do! The fabric choice really makes it. If I HAD a craft chair, I'd do this to it. In the meantime, I'm hauling my computer chair back and forth...
ReplyDeleteI made did this project and it was fun and easy. It was a different chair than the one shown (mine is from 1980 and was living in my office's dungeon). Here's a link to the pics and my blog about the adventure of making it in the middle of the night. Thanks!
ReplyDeletehttp://abbeyinacorner.blogspot.com/2009/07/do-it-yourself-projects.html#comments
Where did you get the DESK??? LOL! I love the chair idea, but I'm obsessed with the adorable desk!
ReplyDeleteI have been googling a tutorial on how to do this very thing! Thank you! I'll link back to you if I do it.
ReplyDeleteThat is adorable!!!!
ReplyDeleteI have this same pattern on some scrapbook paper and I decoupaged it to some plates that I painted black. Check out the link here....
ReplyDeletehttp://timlinzrowland.wordpress.com/2009/06/20/crafting-again/
Super cute!! I've been wanting to do this to my ugly black office chair in my art studio but I was scared to pop off the back worrying it would never go back on Now that I've seen yours I'm ready to try mine! Thanks for the inspiration. : )
ReplyDeletehi. just wanted to say I did the chair just just the one you did:) Thank you so much for giving me the idea!! Check it out!
ReplyDeletehttp://lovelysweetdreams.blogspot.com/2009/09/project-computer-chair.html
The chairs are looking so cute and also worthable.Thanks a lot for your post.
ReplyDeleteKim - Officetronics Products
I so can't wait to do this to my husbands chair. He found a office chair and it's seen better days. Now to find masculine fabric. Off to the fabric store i go
ReplyDeleteThanks for the idea
I'm featuring this on my blog tomorrow. Thanks for the idea!
ReplyDeleteA sports themed fabric would be great for a guy's chair!
This comment has been removed by a blog administrator.
ReplyDeleteSuch a wonderful upgrade! Maybe when I get fed up with the misplaced padding on the seat, I will do this. Love the fabric too!
ReplyDeletewow this office chair that is very beautiful, I love it :)
ReplyDelete